|
1974 Gerald R. Ford This e-exhibit is based on a process set of a proposed inaugural medal design for Gerald R. Ford's 1974 inauguration designed by Ed DeWitt and struck by AMI. The medal was ultimately rejected by the Official Inaugural Medals Committee in favor of one designed by Mico Kaufman and struck by the Medallic Art Company. However, the medal itself was marketed commercially by AMI as an unofficial inaugural medal but they never marketed any process sets. Many times process sets were only assembled on special request for sponsors or the artist therefore production of these sets is quite limited and in many cases are unique. How many were made is unknown but Joe Levine, an acknowledged expert in the field of medals and presidential memorabilia, states in his description of lot 261, Unofficial Ford Presidential Inaugural Medal Process Set, 1974 of the Robert J. Centola Collections Sale held in Baltimore, November 13, 1999 that "We have never seen another." Unlike the uniface process sets illustrated in many of the other e-exhibits featured on this site the set featured here is a true representation of the process involved in the manufacture of a medal. It shows how the design evolves on both sides of the medal as it progresses through nine stages of the process. Each stage actually represents more than one step in the process. Our example starts as do all medals with the raw material. |
||
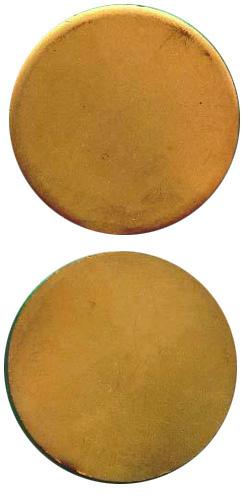 |
Stage 1 A planchet of considerable thickness is required for a high relief medal in order to accommodate the massive amount of metal movement and multiple strikes it will take to bring up the design. The individual blanks for this medal were punched one at a time from "O" gauge strip stock of commercial bronze (usually 90-95% copper, 10-5% zinc). This blank is 2.5 inches in diameter, 0.296 inches thick and weighs 201.6 grams. You can tell which side of the planchet was facing up by the deformation of the metal caused along the edge as it is sheared from the strip. This process does not differ much from coin production except that several blanks are not punched at once nor are the edges of the blanks further formed before the blanks are delivered to the pressroom. |
|
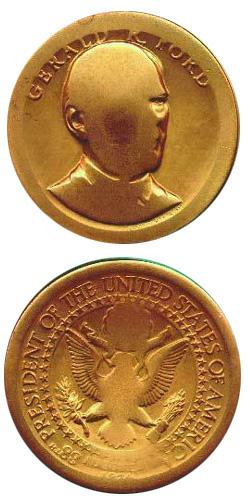
Stage 2 After the planchets have been washed and annealed (softened) they are ready to receive an impression. Even today's large modern presses can not bring up such an intricate high-relief design in a single blow. The results of the first blow leave the medal recognizable but very mushy. The dies force metal to flow out of the low areas of the design and into the high areas. It also flows out from between the dies at the edge since large medals are typically not struck using a collar. This movement of metal generates great heat, which under the tremendous pressure of the press causes the planchet to work-harden. This work-hardening makes additional strikes fruitless until the medal is annealed again. |
 |
|
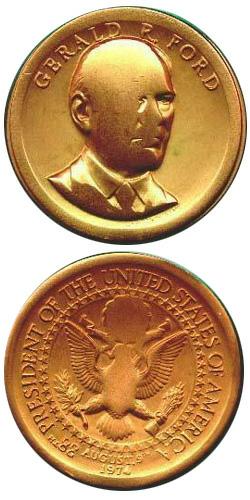 |
Stage 3 Bronze is annealed by heating it in a furnace and then quickly cooling it by immersing it in water. Interestingly this same process is used to harden the steel dies. After annealing, the medal is carefully aligned between the dies for a second striking. More detail is brought up with each blow; but note how, in subsequent stages, the detail is completed first near the rim and last in the center of the medal. Unlike coins, which are struck in a collar, medals are typically not and at this stage you can see a flange, called "flash" starting to be squeezed out from between the obverse and reverse dies. |
|
Stage 4 After another trip to the annealing room the medal is ready to receive its third strike. Aligning the medal with the dies becomes easier with each successive strike due to the fact it becomes somewhat self-keying. The third strike brings up even more detail as metal flows from all parts of the surface into cavities in the dies. For this reason areas of high relief are not usually designed back-to-back on coins since they are required to "strike up" in a single blow of the dies. This however is not a problem for a thick planchet high-relief art medal where multiple round trips between the annealing room and the press room does not pose a problem. |
 |
|
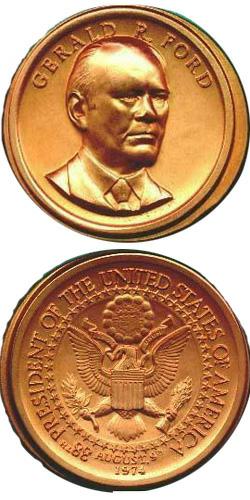 |
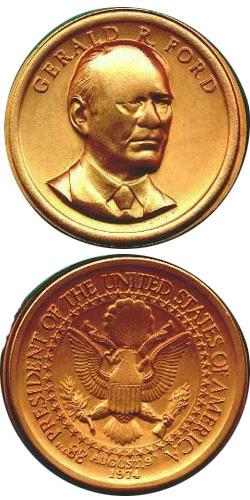
Stage 5 Now back from the annealing room the medal is prepared for the fourth blow from the massive press. But even after this striking with a 600-ton (pressure per square inch) art medal press the high points of the portrait which are the deepest areas of the die cavities are still missing and unfilled. The medal will require annealing yet another time and a fifth striking to bring up the full design. The total number of strikes required for any art medal can vary from two to dozens depending on the depth of the relief of the design. This medal falls into about the middle of that range and is representative of the typical large high-relief medal. |
|
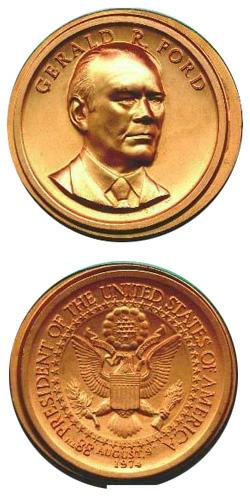
Stage 6 Annealed once more the medal is struck for the fifth and in this case finial time. This fifth strike finally brings up the full detail of the design leaving a proof-like finish on our subject medal. Also notice that the flange or "flash" from having been struck without a collar is very prominent at this point. This is evidence of the tremendous amount of metal movement generated by the five strikings of the powerful art medal press. The medal now leaves the pressroom for the last time. Its next stop is the finishing area where among other things the flange or "flash" is removed as the medal takes on it's finial appearance as it is readied for sale. |
 |
|
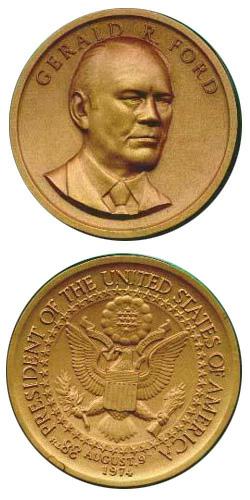 |
Stage 7 This stage actually represents multiple steps in the manufacturing process of an art medal. First, the medal is mounted on a turning lathe in soft keys that mimic the design where it is then machined to the proper diameter removing the flange or "flash" in the process. On some medals you can see the fine groves left behind by this machining operation. Next the edge lettering identifying the minter, metallic composition and appropriate copyright information is applied. Then it is sandblasted which is a high pressure pelting of the entire surface with tiny grains of sand or glass beads to mute the proof-like surfaces. Some medals are lacquered at this point and readied for sale; however, ours like most has one more step. |
|
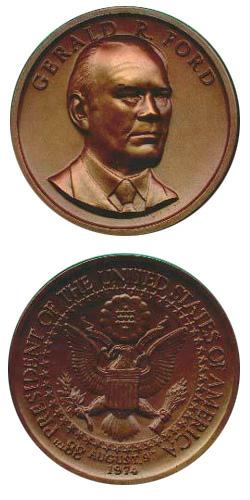
Stage 8 Many bronze as well as silver medals are marketed with an antique finish and this one is no exception. The medal is first coated with an oxidizing solution designed to darken and highlight the lower elements of the design. In the case of this medal it was doused in ammonium sulfate for only a few seconds to give it its dark color. A finisher would then have removed the solution from the high points and adjusted the effect before the solution dried. Timing is critical at this stage as the longer the time the darker the color and the more difficult it becomes for the finisher to manipulate it. The solution was allowed to dry on this medal for illustration purposes. |
 |
|
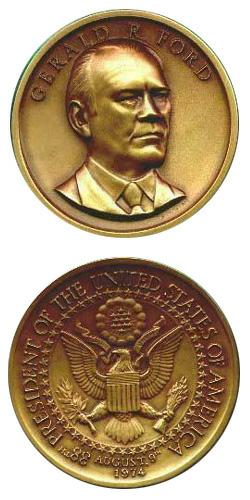 |
Stage 9 After finisher removes or "relieves" the dark color from the high points and background using a powered buffing wheel leaving color only in the crevices and recesses the medal takes on a "two-toned" appearance that further highlights its sculptural detail. This handwork gives each medal a slightly different look. The medal is then washed, dried, and baked to remove all moisture before finally being lacquered. to protect the bronze from tarnishing the medal is now complete! In it's final state it is still 2.5 inches in diameter, it measures 0.3125 inches thick at the rim and the maximum relief measured from the highest point on the reverse (the rim) to the highest point on the obverse (Ford's eyebrow) is 0.469 inches or just over 7/16 of an inch. The President's likeness rises just over 1/8 inch above the protective rim! Its weight has been trimmed to 176.4 grams some 25+ grams or 12.5% less than the original 201.6 gram blank it started from. Much work and craftsmanship have gone into this medal and it now only requires packaging and home. |
|
|
|
||